
请确保已经完成1
1.下载
地址:https://archive.apache.org/dist/hadoop/common/hadoop-2.10.1/hadoop-2.10.1.tar.gz
在主节点上执行:
下载:
wget https://archive.apache.org/dist/hadoop/common/hadoop-2.10.1/hadoop-2.10.1.tar.gz解压:
tar -zxvf hadoop-2.10.1.tar.gz

进入文件夹:
cd ~/hadoop-2.10.1/查看下载软件的版本:
./bin/hadoop version

2.修改配置
2.1 修改slaves
在主节点上执行:
- 修改 slaves 文件:
vim ~/hadoop-2.10.1/etc/hadoop/slaves
修改为: 1
2ecnu02
ecnu03
2.2 修改core-site
- 修改 core-site.xml:
vim ~/hadoop-2.10.1/etc/hadoop/core-site.xml
1 |
|

2.3 修改hdfs-site
- 修改 hdfs-site.xml:
vim ~/hadoop-2.10.1/etc/hadoop/hdfs-site.xml
1 |
|
2.4 修改hadoop-env
修改 hadoop-env.sh:
vim ~/hadoop-2.10.1/etc/hadoop/hadoop-env.sh将
JAVA_HOME改为:
1 | export JAVA_HOME=/home/dase-dis/jdk1.8.0_202 |

2.5 拷贝安装包
好了好了,终于改完了,接下来将改好的这份hadoop拷贝到其余三台机:
拷贝到从节点1:
scp -r /home/dase-dis/hadoop-2.10.1 dase-dis@ecnu02:/home/dase-dis/拷贝到从节点2:
scp -r /home/dase-dis/hadoop-2.10.1 dase-dis@ecnu03:/home/dase-dis/拷贝到客户端:
scp -r /home/dase-dis/hadoop-2.10.1 dase-dis@ecnu04:/home/dase-dis/
其实打包一下拷贝会更加好的,这里偷懒了

3.启动HDFS服务
3.1 格式化
注意: 仅在第一次启动 HDFS 时才需要格式化 NameNode,如果是重启HDFS那么跳过这步,直接执行下一步即可。 此外,在进行 NameNode 格式化之前,如果~/hadoop-2.10.1/tmp/文件夹已存在,那么需要删除该文件夹后再执行以下格式化命令。
如果启动时炸了,CTRL+C了,断电了,请参考后文解决办法,可能仍然需要格式化
- 格式化命令:
~/hadoop-2.10.1/bin/hdfs namenode -format

3.2 启动
- 启动:
~/hadoop-2.10.1/sbin/start-dfs.sh

3.3 验证
验证:
jps主节点

- 从节点

浏览器访问http://主节点IP:50070/,(如果主节点是云服务器记得把防火墙打开)
开防火墙:

集群工作正常:

查看节点信息:

3.4 集群异常解决
- 如果因为一些情况导致集群第一次没有启动成功,请在主、从节点:
在主节点, 停止集群:
~/hadoop-2.10.1/sbin/stop-dfs.sh删除运行生成文件:
cd ~/hadoop-2.10.1/tmp/dfs && rm -rf *删除日志:
cd ~/hadoop-2.10.1/logs && rm -rf *解决端口占用:
sudo reboot在主节点, 重新执行格式化命令:
~/hadoop-2.10.1/bin/hdfs namenode -format
- 云服务器可能会出现的错误
- 错误日志:
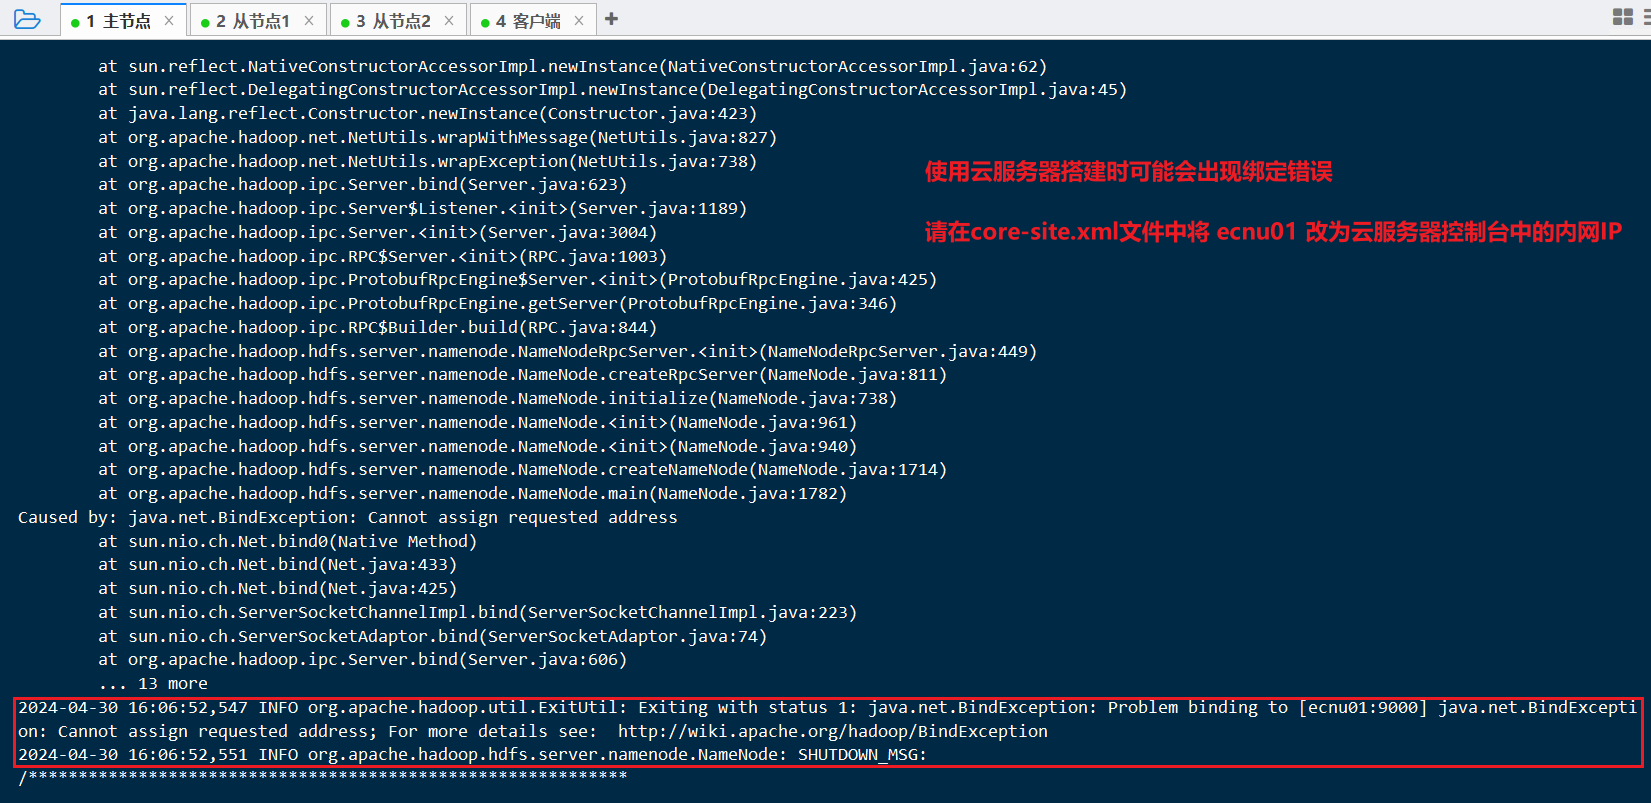
提示绑定错误或
2024-04-30 16:06:52,547 INFO org.apache.hadoop.util.ExitUtil: Exiting with status 1: java.net.BindException: Problem binding to [ecnu01:9000] java.net.BindException: Cannot assign requested address; For more details see: http://wiki.apache.org/hadoop/BindException的检查文章
spark-1中提到的hosts设置是否正确, 设置好了不会出现这种情况参考:
https://blog.csdn.net/xiaosa5211234554321/article/details/119627974
https://cwiki.apache.org/confluence/display/HADOOP2/BindException
4.HDFS Shell
注意:第一次使用 HDFS 时,需要首先在 HDFS 中创建用户目录
打开工作目录:
cd ~/hadoop-2.10.1为当前 dase-dis 用户创建一个用户根目录:
./bin/hdfs dfs -mkdir -p /user/dase-dis
HDFS Shell目录操作示例:
显示 hdfs:///user/dase-dis 下的文件:
./bin/hdfs dfs -ls /user/dase-dis新建 hdfs:///user/dase-dis/input 目录:
./bin/hdfs dfs -mkdir /user/dase-dis/input删除 hdfs:///user/dase-dis/input 目录:
./bin/hdfs dfs -rm -r /user/dase-dis/input